Mutt is a simple free and open-source text-based email client for Unix-like systems. Being text-based, it requires fewer system resources and can run on older systems.
Mutt was originally developed by Michael Elkins in 1995. Now if you are a fan of using a terminal then you can try this as well.
In this article, I will discuss how to install and use the Mutt email client on Ubuntu.
Features of Mutt terminal-based email client
The key features of Mutt are –
- Small and efficient
- Text-based user interface
- It is highly configurable with keybinding and macros support
- Supports regular expression for searching emails
- Supports PGP and MIME
- It supports various protocols including POP3, SMTP, IMAP, etc.
How to install Mutt in Ubuntu
Mutt is available in the default repository of Ubuntu. Before installing it on your system first run the given command to make sure the packages on your system are updated.
sudo apt updateNext, use the given command to install the Mutt email client on your Ubuntu system –
sudo apt install muttPress y and then enter when it asks for your confirmation.
Configuring Mutt email client
Before you can send or receive emails first you have to configure your email account to Mutt. Follow the given steps to configure it –
mkdir -p ~/.mutt/cache/headersmkdir ~/.mutt/cache/bodiestouch ~/.mutt/certificatesNext, create the Mutt configuration file –
touch ~/.mutt/muttrcNow open this file using a text editor –
sudo nano ~/.mutt/muttrcAdd the following lines to this file –
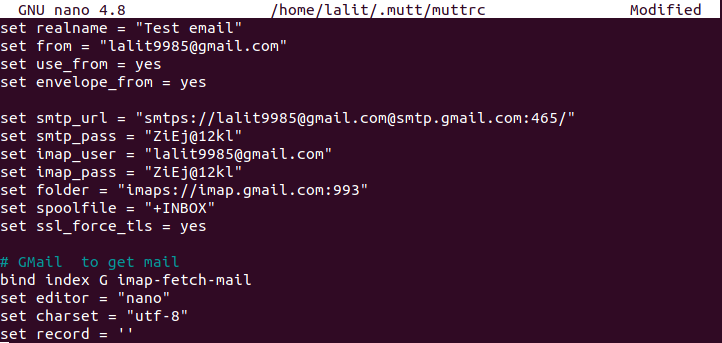
set realname = "Test Email"
set from = "<gmail_username>@gmail.com"
set use_from = yes
set envelope_from = yes

set smtp_url = "smtps://<gmail_username>@gmail.com@smtp.gmail.com:465/"
set smtp_pass = "<password>"
set imap_user = "<gmail_username>@gmail.com"
set imap_pass = "<password>"
set folder = "imaps://imap.gmail.com:993"
set spoolfile = "+INBOX"
set ssl_force_tls = yes

bind index G imap-fetch-mail
set editor = "nano"
set charset = "utf-8"
set record = ''
Don’t forget to use your own username and password.
Now save this file by pressing ctrl+s and then exit from the editor by using ctrl+x.
Using Mutt on Ubuntu
Once you are done configuring mutt now you can start using it. Use the following command to load your inbox on your terminal.
muttOnce you press enter after entering the command first it will authenticate using your email and password if successfully authenticated you will be able to see your emails.
To send a new email just press m and provide the information that it asks to compose your email finally press y to send it.
OR you can directly use the given command in your terminal to send an email –
mutt -s "Test Email" Email of recipient
If you want to send an attachment with your email then use the command as given below –
mutt -s "Subject" -a <path of attachment file> -c <email address of CC> Email address of recipient
Now for more information, you can check the man page of mutt command by running –
man muttConclusion
I hope you have successfully installed and configured the Mutt email client on your system. Now if you have a query then write us in the comments below.